When my daughter was in pre-school, we used to rejoice when she came home with dirty feet. Sand between the toes? Yes! Caked-on mud? Bring it on!

Why? While we weren’t necessarily enamored with long scrubbing sessions in the bathtub (though those were fun, too), we knew that muddy feet–and fingernails and knees–meant that profound play was happening. We since learned that dirt can even be good for your health!

The 7th annual Kids to Parks Day, Saturday, May 20, is a national day of play. You can register for one of more than 1,200 events around the U.S. and join the fun, get out with your family and friends, and win prizes at the height of spring.
You can also enjoy Kids to Parks Day, or any kids-to-parks day on your own, in your local playground or park. Here are a few suggestions for creating some memorable, and maybe a little muddy, experiences.
… Before you head out, don’t forget to grab some good sports shoes that are rugged enough for play; affordable enough that you won’t be afraid to let your kids wear them outdoors; and ventilated, washable and drainable for those times when a little mud happens, or is even sought out. These are from Kids to Parks Day sponsor, Northside USA. (Keep reading for a giveaway featuring Northside USA Shoes!)

Make a Mud Pie or Garden Soup

The perfect kitchen may be outside! Find dirt or sand and a water source and pour batter-like mud into used measuring cups, pans, cupcake and pie tins, and pails. Decorate with leaves, petals and rocks. Or pour water into cups and bowls and add flower petals, food coloring or glitter inside to make potions and soups. Make a bench or a tree stump your cooktop, and “bake” away without any of the typical kitchen clean-up.

Read more from Jackie at Happy Hooligans (where these fantastic photos come from):
Garden Soup
Mud Kitchen Activity
Adopt a Flower and Watch it Grow

Do you often return to the same park or garden? “Adopt” a flower for the season and watch it grow over time. Bring a ruler or yardstick or measure it against your own body. Have space at home to plant a flower? Get some large seeds that little hands can tuck into the dirt, and plant easy growers like nasturtium, pea, beans, sunflowers or gourds. Growing edibles? You might want to sing this song:
Dirt made my lunch,
Dirt made my lunch.
Thank you Dirt, thanks a bunch,
For my salad, my sandwich
My milk and my munch ’cause
Dirt, you made my lunch.

Read more:
Beginner’s Guide to Getting Your Garden Growing
11 Ways to Make Gardening Extra Fun for Kids
Make and Sail a Paper Boat


This is a timeless idea that we got from our friend, Curious George, who made boats from the newspapers he should have been tossing on his paper route. Make your own paper boat and sail or race it in a creek or other body of water. Some of these boats have strings attached, so they can be launched without actually sailing away.
Play Pick Up Sticks or Pooh Sticks

The original pick-up sticks were ancient fortune-telling devices, but you can play this game anywhere, indoors or out, without even attempting to see the future. Hold your sticks in a bundle, then release them so that they land in a pile. Take turns trying to remove one stick at a time, without disturbing any other sticks. When a stick from the pile is disturbed, the next person takes a turn. When all the sticks have been removed from the pile, players total either their number of sticks – each one is worth one point. Near a creek or stream? Try your hand at Pooh Sticks, a stick-racing game inspired by Winnie the Pooh.
Build a Sandcastle or Make Sand Art

It isn’t officially spring until you get some sand between your toes at a beach park or sandbox. Pack the wettest sand you can find into mounds to make castles or carve them into other designs.

Decorate your creations with flags, or twigs, shells or other found objects.

Raise your own tadpoles
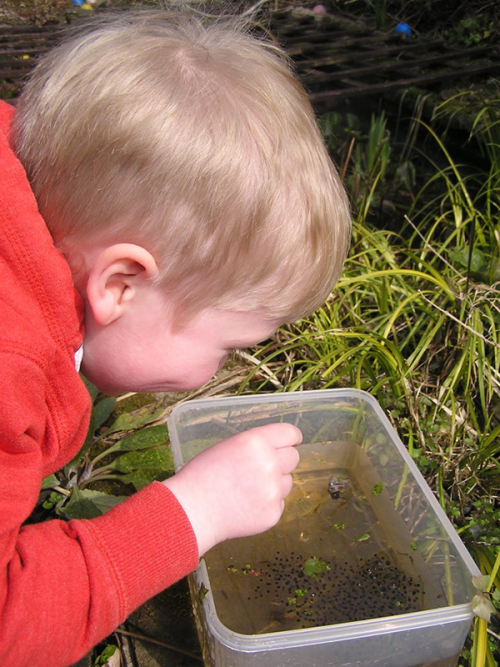
What better way to explore the cycle of life than to raise tadpoles and then release the frogs back into ponds and streams? Kids won’t soon forget this fun project. Looking for more pond activities? Try making a collecting cattails, making a water scope, or one of these other activities for a day at the pond from KCEdventures.

Photos: Rainy Day Mum, KCEdventures
Explore a Tidepool

When the ocean recedes, the mysterious undersea world is revealed, and creatures like barnacles, crabs, periwinkles and sea stars can be seen if you walk among them gingerly. Read how and where to explore tidepools and how to preserve tidepool habitats for the enjoyment of others.
See more photos from our trip to the tidepools.


How will you play outside on Kids to Parks Day?
Register to be counted on Kids to Parks Day and you may win one of many cool prizes, including a special camping package from The North Face (4 sleeping bags, tent, and duffel bag), or one of the additional prizes from CamelBak (family hydration pack), Eastern National (Jr. Ranger package including a park pass for a whole year), and National Geographic (a set of kids’ books about nature and parks). How great is that?
Plus, every person who signs up will receive a special promo code from Northside Shoes. Keep checking the list of Kids to Parks Day events as we get closer to May 20th. There are new park events added each week!

… And, remember how I mentioned the importance of having shoes you can feel good about wearing for mud and other outdoor play? I’m giving away a pair of Northside Shoes! To enter, take the pledge to play outside on Kids to Parks Day Saturday, May 20, and then leave a comment here, telling me that you pledged and how you plan to play outside. If you have a favorite mud-play activity, I’d love to hear about that, too. The giveaway will end Friday, May 19, 11:59 p.m. PST. A random winner will be chosen. The winner must reside in the U.S.
Good luck!
Photos: Susan Sachs Lipman, Public Domain, Happy Hooligans, Rainy Day Mum, KCEdventures